Lighting effectively for Green Screen

Hiring a green screen studio with a pre-lit backdrop can save you a tonne of time setting up, allowing you to focus on capturing great performances.
Anyone who has ever had a go at doing green screen work always has a horror story to tell. This is because doing green screen well is an art form! So, in this post (based on previous experience) I’m going to explain how to set up and light your subject for green screen so that when it comes to keying the background out you give yourself the best chance of a clean key.
I must state now that this is not a keying tutorial. For that, I highly recommend this tutorial on advanced green screen keying in After Effects from 8 Bit Digital TV. Their process is explained clearly and concisely without the waffle - there’s no way I could improve on this!
So, here are my tips for setting up and lighting your green screen effectively, with example images based on medium close ups.
1. Find the largest space you can and blackout any windows
We want complete control of the space, so it’s important to stop any natural light coming in. You’ll also find that your working area gets quickly filled up with all the lights and stands, so whilst they say that bigger isn’t always better…in this case it most definitely is!
2. Decide whether you actually need a green or blue backdrop
One situation where blue screen might work better for you over green is if you’re filming a subject with blonde hair, because blue is directly opposite yellow on the colour wheel. Whilst in the tutorial below, the colour of the backdrop is enhanced at the start of the keying process, you really don’t want to risk having colours that are too similar next to each other. If you’re using a pop up screen the chances are it will have blue on one side and green on the other, but the downside of these is that they’re usually quite small.
3. Setup your backdrop as far away from your subject as you can (whilst still managing to fill the frame)
Very important - we must not have any green spilling onto our subject!
4. Determine your talent’s acting area and make them aware of it
It’s crucial they know where the edges of your frame are, as well as what is actually being lit for keying.
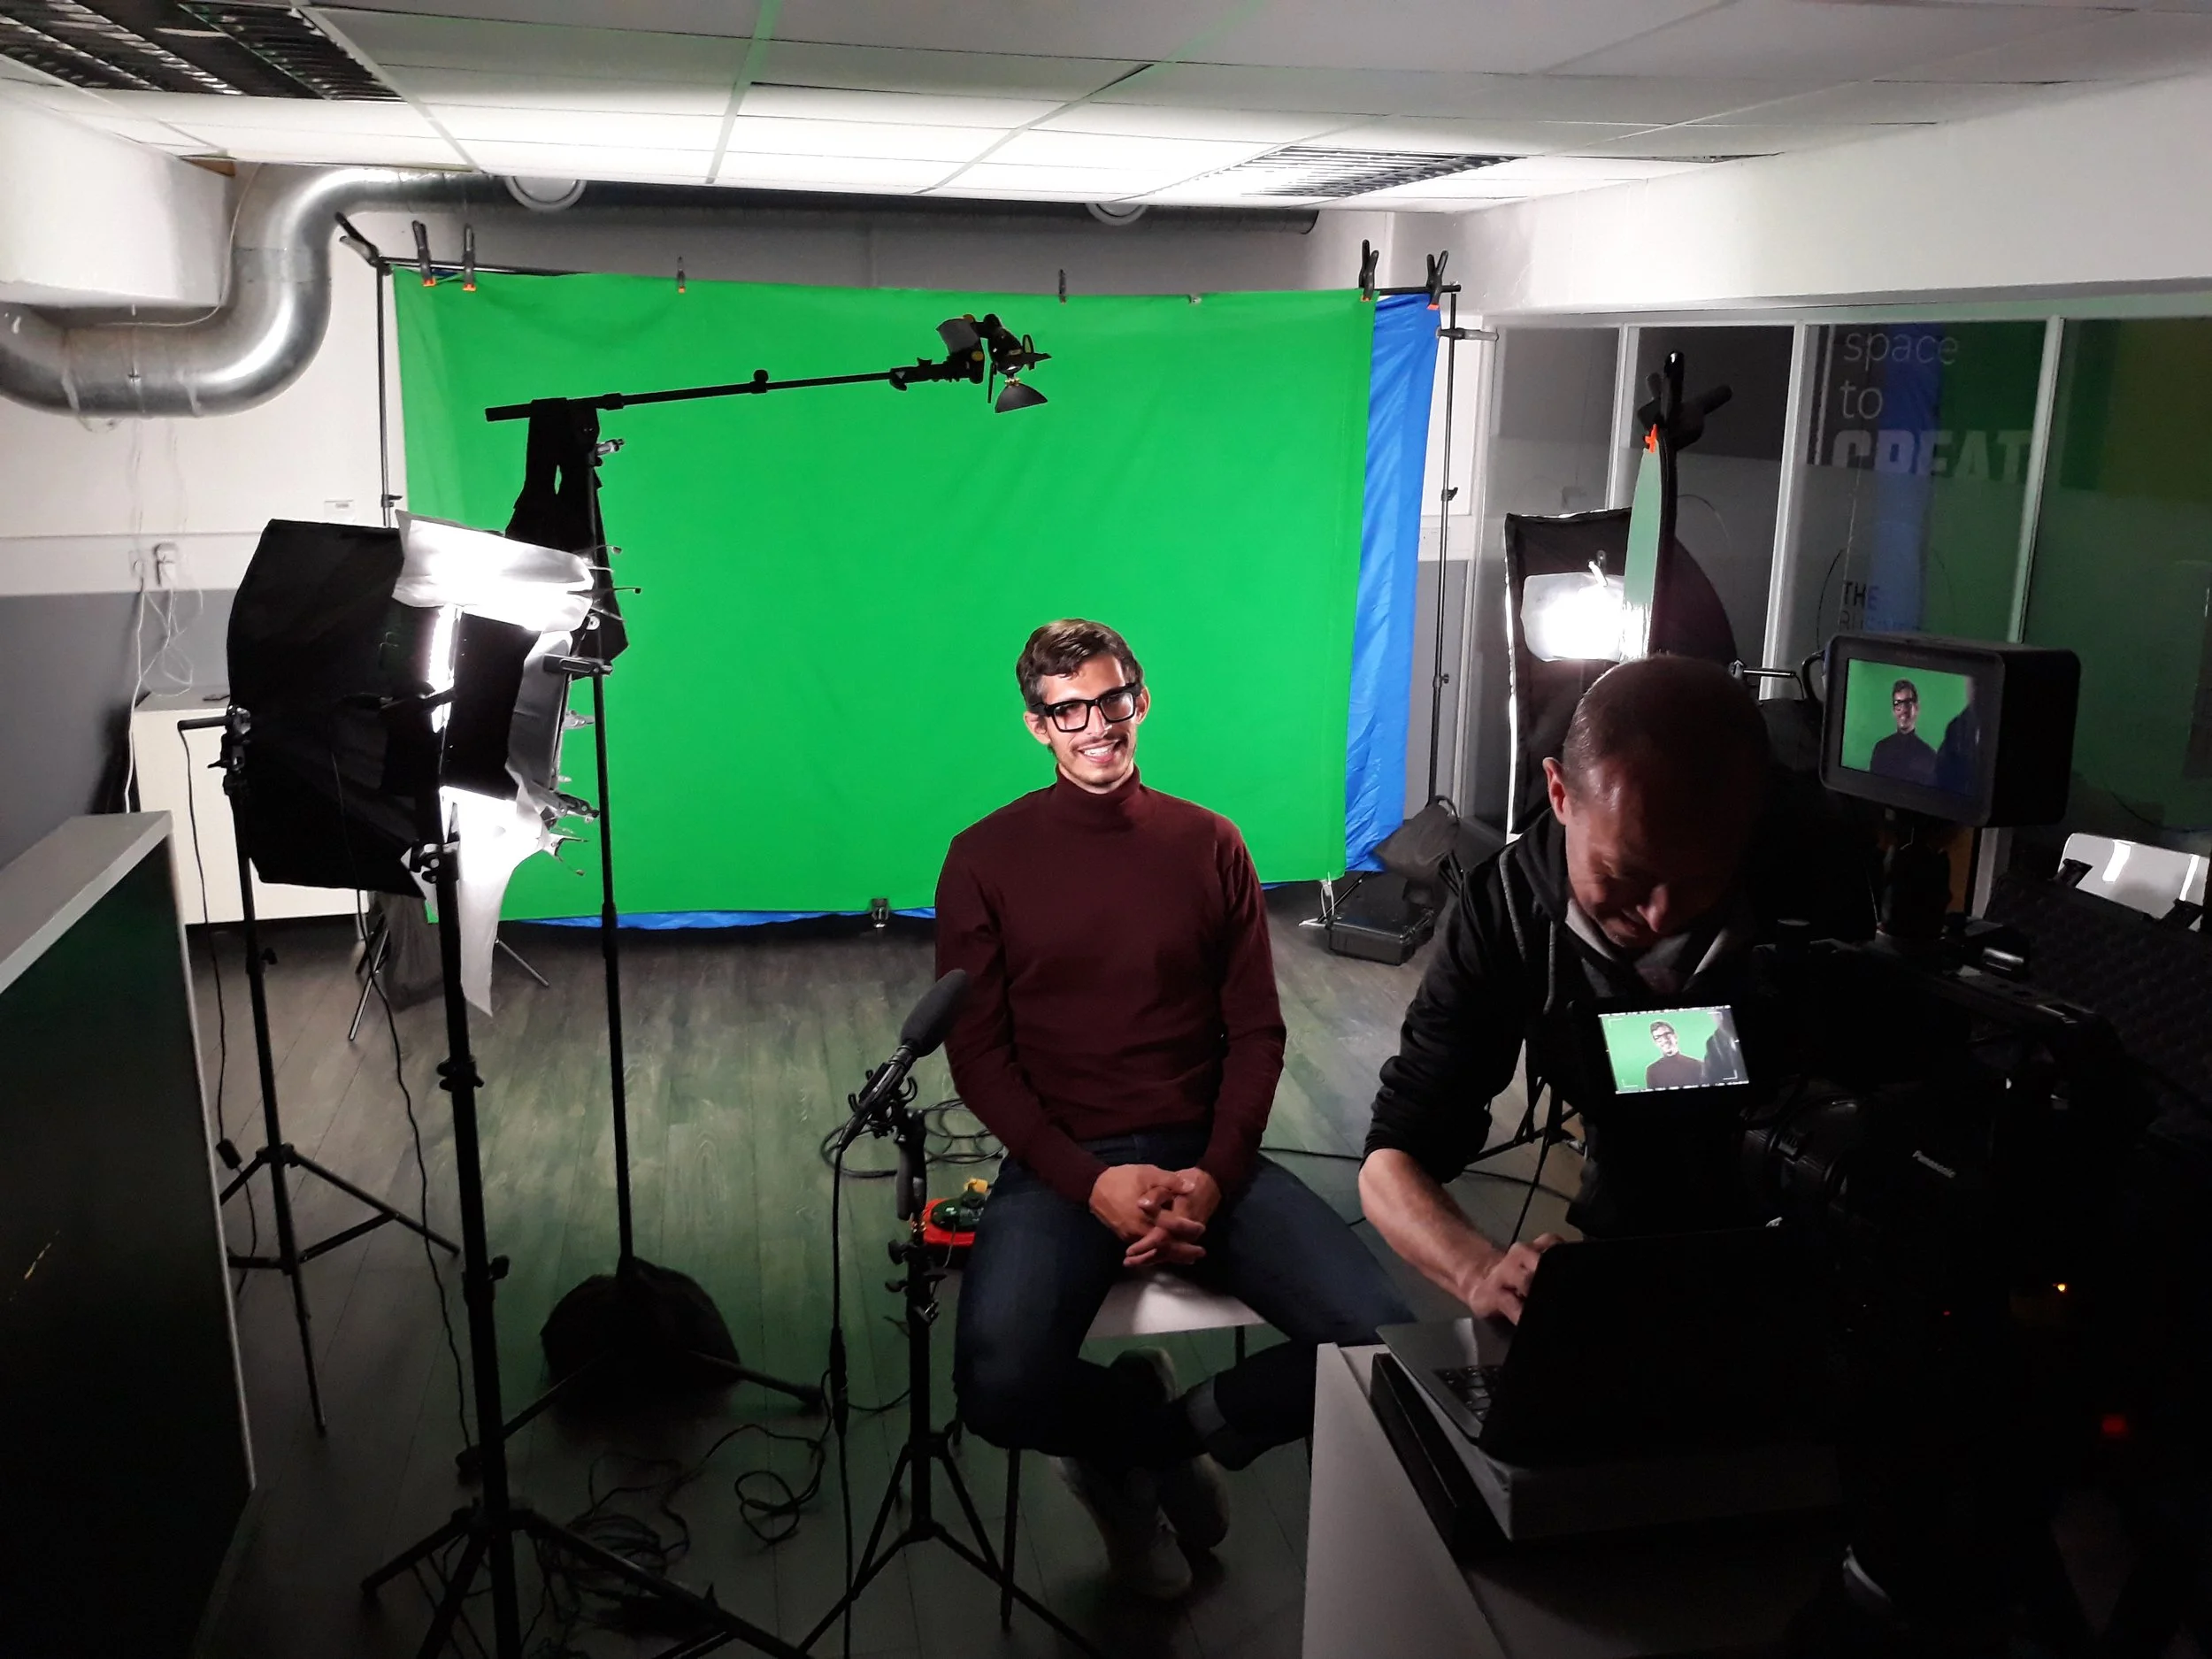
This basement office was an ideal location for a pop up studio - a fairly decent size, few windows to block out and a generally quiet environment.
5. Ensure your backdrop is taut, using clips and weights. If using a cloth green screen, iron out the wrinkles
If you’re shooting using a decent video codec and are evenly lit, you don’t need to be too strict about this, but every little helps. It’s also worth bearing in mind that if you have corners of the screen that aren’t perfect and your subject won’t be crossing them, then you won’t need to worry as you can mask out their acting area before keying.
Lastly, if you’re using a cloth green screen be warned that cheaper ones can be very thin and might need something behind them to stop them being translucent. Don’t take any risks!
6. Light from the back and move forward, starting by setting up equidistant soft lighting for your backdrop
Lighting from the back is always best with green screen as it’s easier to spot any potential issues concerning spill. Use the waveform or false colour on your monitor to ensure that your backdrop is as evenly exposed as possible. To avoid hot spots, it can be effective to cross light i.e. the light on the right hand side lights the left hand side and vice versa.

If this were a green backdrop it would be a disaster. The light is clearly bouncing off the backdrop onto the subject!
7. Put your subject in position without lighting them to check for any background spill
It’s important that you have them in complete silhouette because any spill will be much easier to spot now rather than after they’ve been lit. Move them forward or reduce the brightness on the backdrop if necessary until any spill is completely gone and mark their final position.
8. Using a c-stand and boom arm, add a hair or rim light to create more separation.
This is the most time-consuming light to setup, as it needs to be in a specific place and safely rigged. But it’s important because keying around hair can be one of the trickiest parts of the process. A hair or rim light will really help separate them, even if your subject has wispy hair. How hard or soft this light is depends on your taste and what you have available, but generally I find harder sources work better for dark hair and softer for fair hair.
9. Setup 2x 3/4 back lights (kickers) to help define the edges of your subject
How strong and hard these are depends on the subject matter and tone, but even subtle backlights can really help to make your subject pop out from the background and key beautifully. Tube lights can work really nicely and quickly for this part. Set them up for now and you can adjust your levels at the end.
10. Set up your key light using a large soft fixture. Check that this light doesn’t create a shadow of them on the backdrop.
If they’re far away enough from the backdrop then this shouldn’t be an issue, especially as soft light falls off quite quickly. But still, check for shadows just in case.
11. Fill them with another soft source or reflector, if you feel the shadow is too deep.
This is more of a stylistic choice rather than a necessity, so it’s up to you whether this is needed considering your subject matter. Bear in mind that your 3/4 backlight might be doing enough of the work filling in the shadow already.
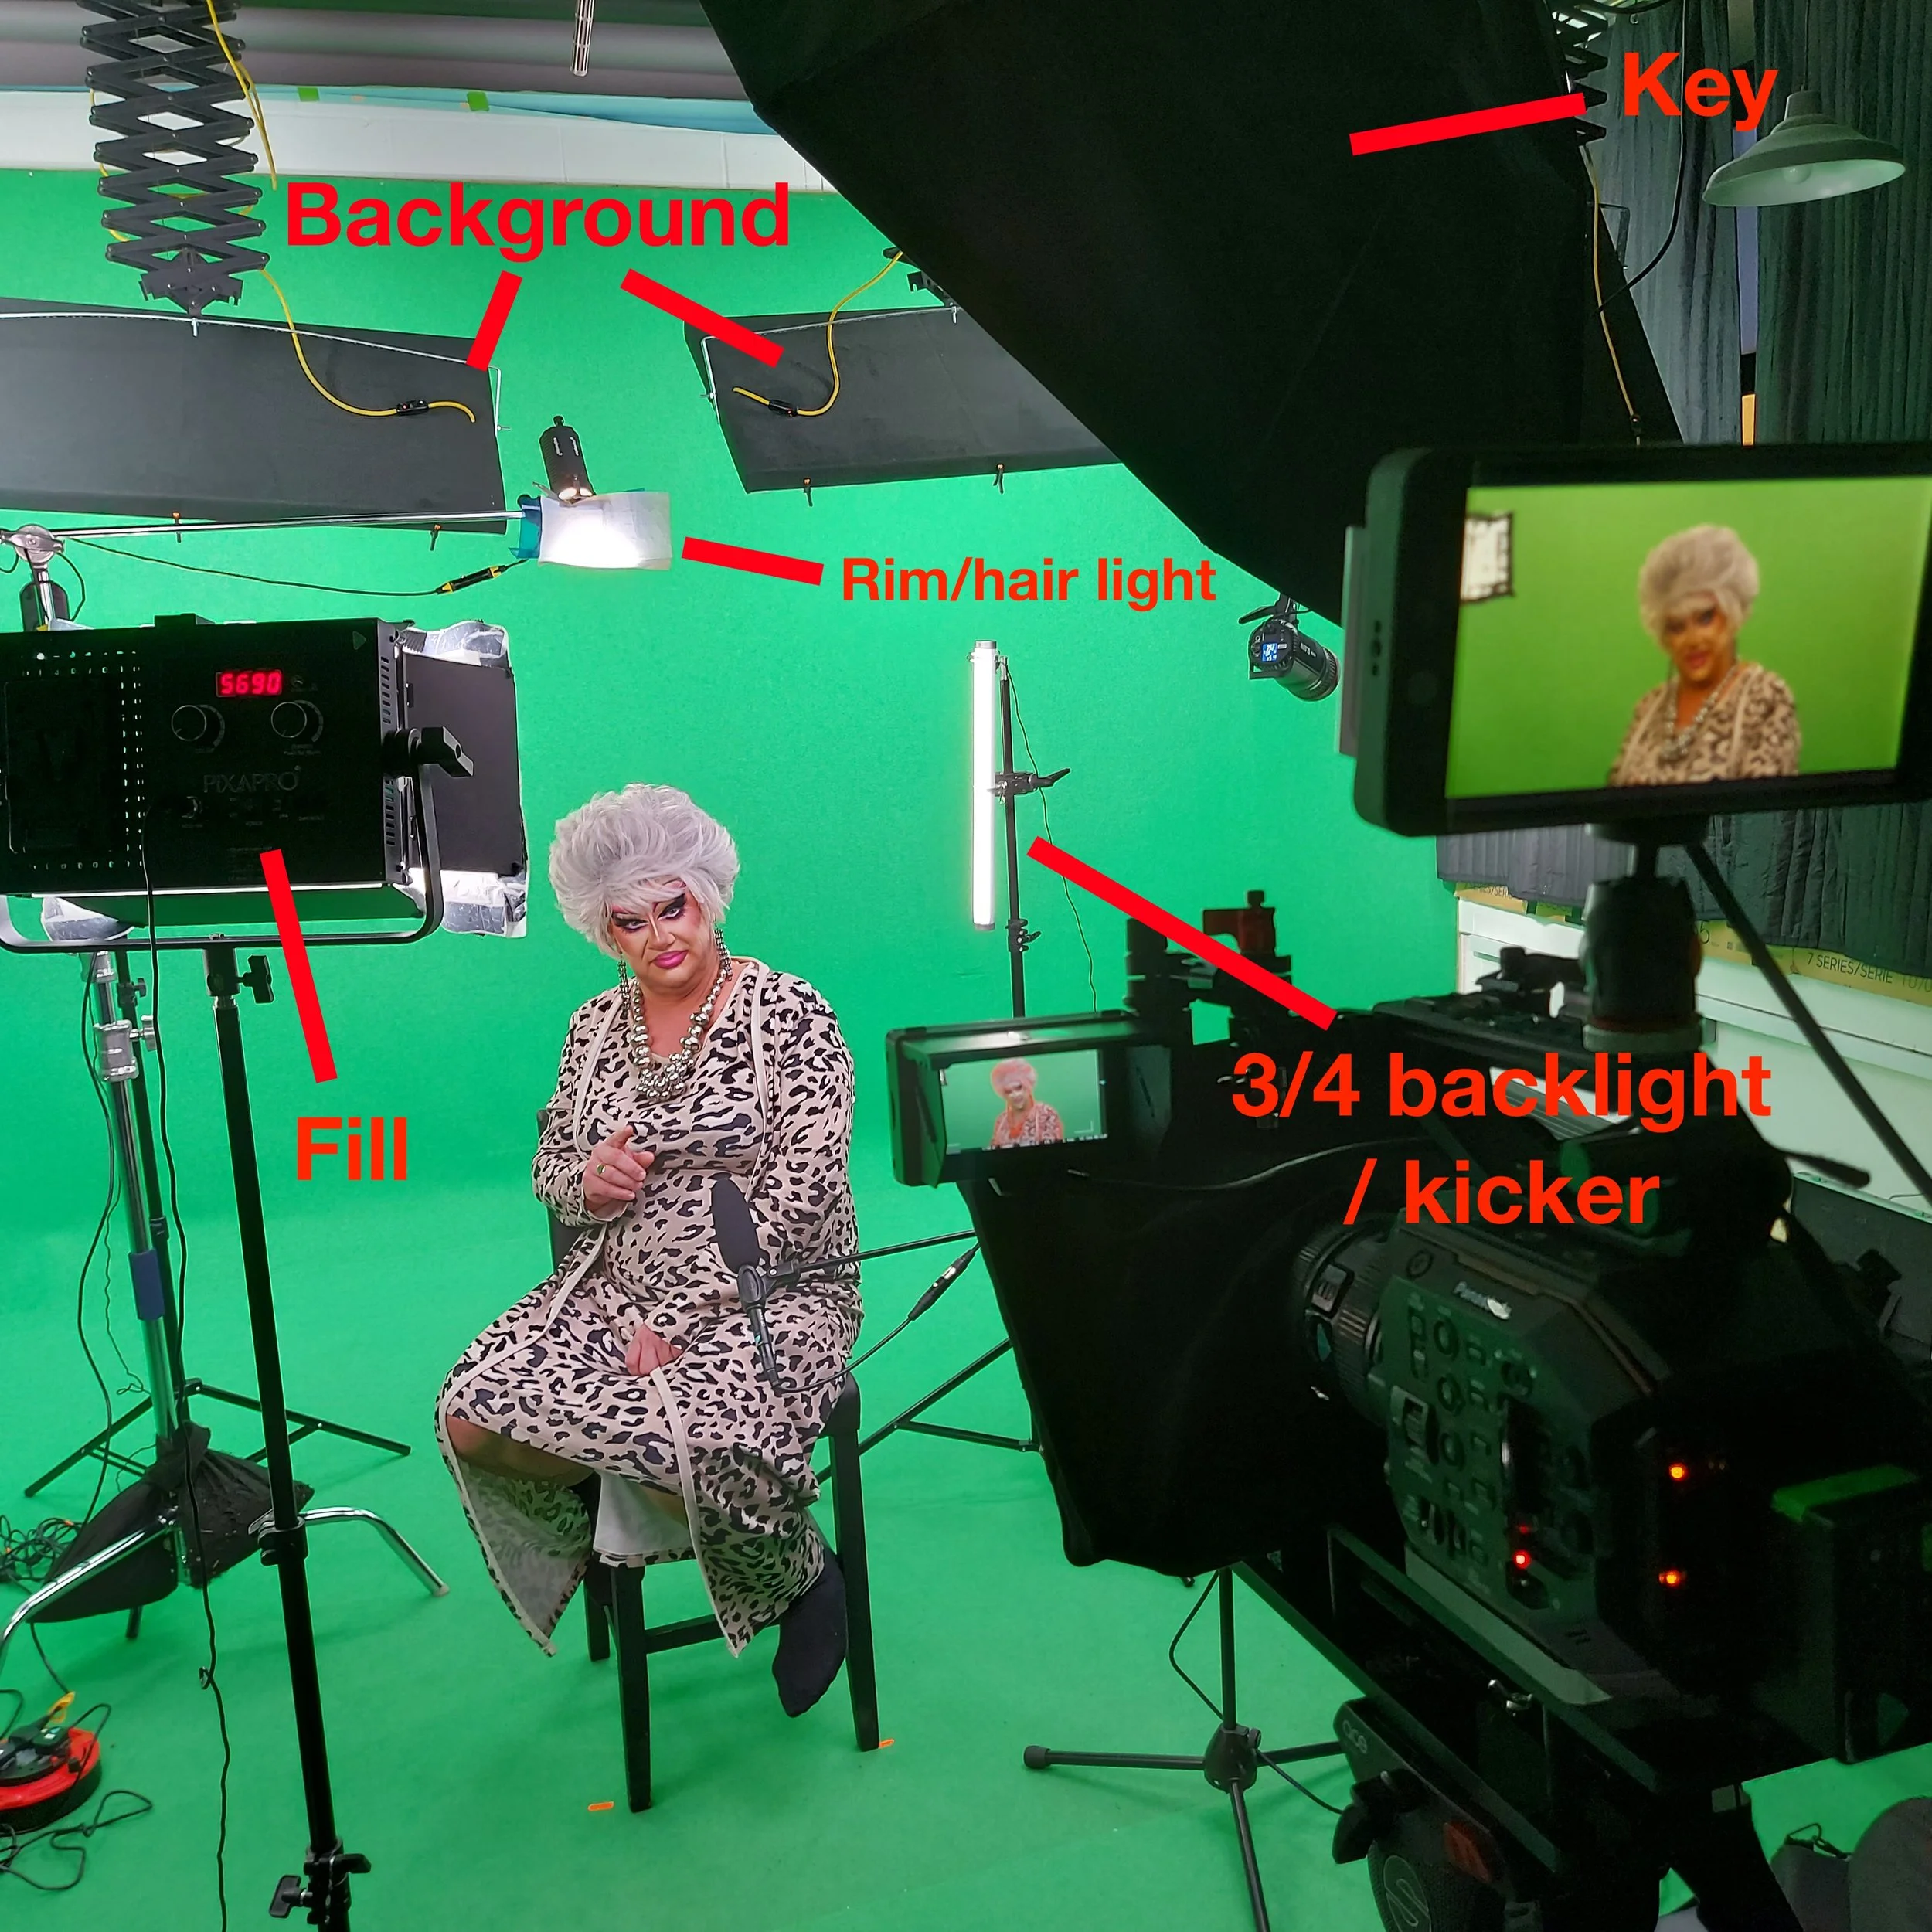
All of the lights in practice
12. Check your light levels and colour temperatures. Adjust to taste.
Don’t over-expose your green screen in relation to your subject. I generally find exposing a stop under the key light works best. Make sure your cameras’ white balance matches that of the backdrop lights and ensure the colour of the lighting on the subject best matches the background that will be used to replace the green screen. Although you’ll be able to colour grade the subject independently from your background image whilst editing, if you’re in any doubt it's usually safest to match all of the lights to the same colour temperature!
13. Ideally shoot using a 10-bit (or greater) codec and 4:2:2 (or greater) chroma subsampling.
You want as much colour information as possible for a clean key.
14. Make a final check for any spill
Check that no props or parts of the costume reflect green when your subject moves around, especially on the edges (unless you enjoy the process of masking things out!)
15. Shoot..
..and hopefully, it goes smoothly!
16. Key your footage using this tutorial…
…colour grade your footage, pop in your background and then hopefully end up with some great composited images!

Images from various escape room experiences produced by The Business Creative


Hopefully you’ve found this step by step process useful. But before you go, I highly recommend testing a green screen lighting setup before taking on a paid client job, or at the very least, scheduling in plenty of load in and set up time on the day to minimise stress levels! A calm, creative environment is best for all involved as it allows for everyone to perform to the best of their abilities and ensures that great client service is given from the get go.
Thanks for reading.
Other posts that may interest you:
Creating the white screen ‘studio’ look isn’t as tricky as green screen, but if you want it to look as good as possible, it still requires a decent set up! Here’s how I do it.
Find out what goes on during a typical shooting day when filming an unscripted school promo.